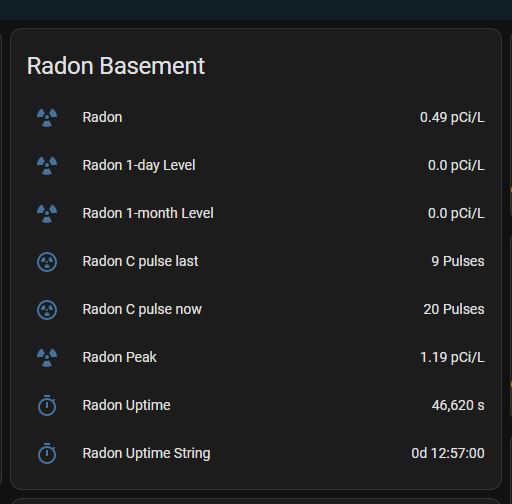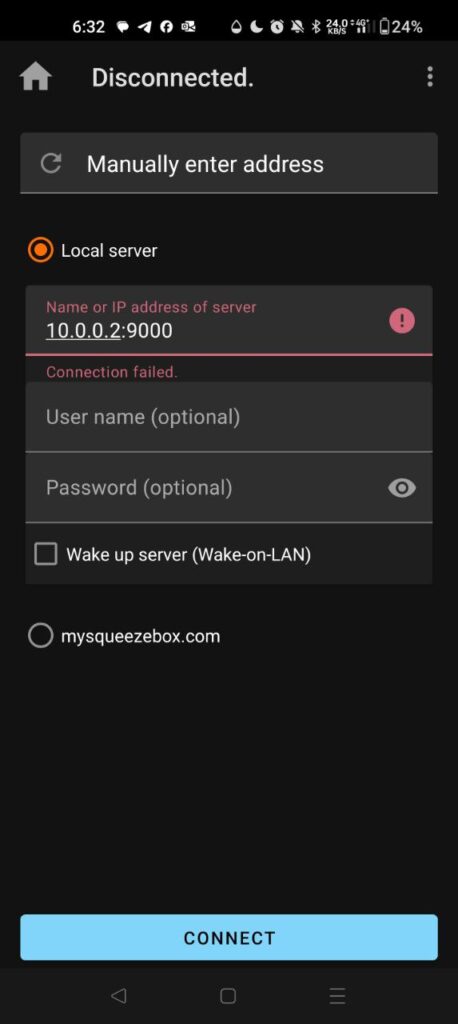
Controlling your thremostat shouldn’t be difficult. The Pearl Zigbee thermostat is now discontinued and can be obtained from sites such as Ebay for around 30 USD. In a nutshell don’t buy the Centralite Pearl Zigbee Thermostat. Reason: It randomly disconnects from the Zigbee Network and refuses to rejoin uness you press a number of very cryptic things on the display to get it working again. Not family friendly….
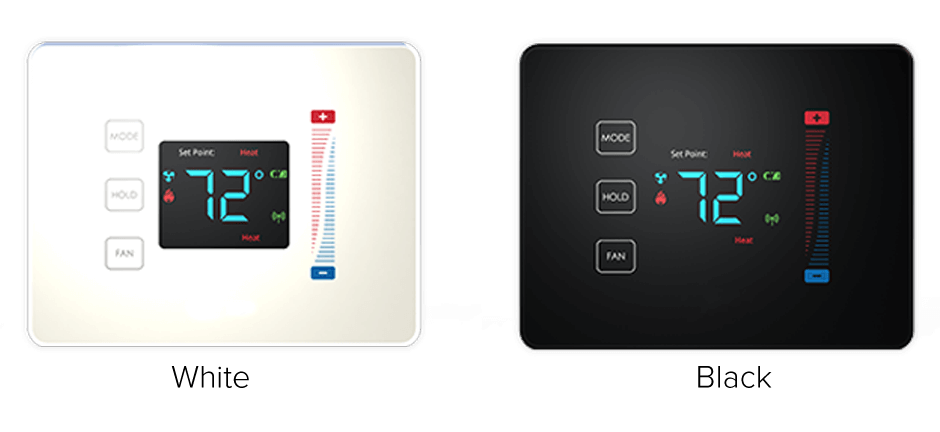
How to enter thermostat Programming Mode. The thermostat needs to be in an “off” state. To turn the thermostat off, press the “Mode” button until “Off” appears on the screen. Once in the off state, PRESS BETWEEN the hold button and the fan button. Continue to hold and swipe down on the right slider – “01” will display
• When “01” is displayed, it indicates you are in “programming mode.”
• Use the + and – buttons to advance through the menu options listed below in the “MenuOptions” list.
• Use the HOLD button to enter a menu option then use the + and – to set the appropriate value and then HOLD to confirm you menu choice (HOLD is used like the ENTER key)
• *Note, utilizing the MODE button will exit you from the menu*
• When finished programming, tap the MODE button until the thermostat to EXIT the menu and returned to normal operation – programming mode has been exited.
**Menu Options**

1 - Display Celsius and Fahrenheit
   0- Celsius
   1- Fahrenheit (Default)

2 - Heat type (Heat pump / Non Heat pump)
    0- Non Heat pump(Default)
    1- Heat pump

3 - Heat source (Gas / Electric)
    0- Electric
    1- Gas(Default)

4 - Temperature Calibration
    -2.5 – +2.5 Celsius
    -4.5 - +4.5 Fahrenheit
    (Default) - 0

5 - Set Minimum Heatpoint
    (Default) – 44 Fahrenheit, 7 Celsius

6 - Set Maximum Heatpoint
    (Default) – 86 Fahrenheit, 30 Celsius

7 - Set Minimum Coolpoint
    (Default) – 44 Fahrenheit, 7 Celsius

8 - Set Maximum Coolpoint
    (Default) – 86 Fahrenheit, 30 Celsius

9 - Set Minimum Deadband
    (Default) – 1.8 Fahrenheit, 1.0 Celsius

11 - EZ Mode
    11- Yes
    All others - No

12 - Join Network
    0- No
    1- Yes

13 - Leave Network
    11- Yes
    All others - No

14 - Rejoin Network
    0- No
    1- Yes

15 - Redetect System Type
    0- No
    1- Yes

    **Types Detected**

    04 - HP TWO COOL TWO HEAT
    05 - TWO COOL TWO HEAT
    FF - INVALID RELAY CONFIGURATION

16 - Reset

    0- No
    1- Yes

    00 - Cool Only
    01 - Cool with reheat
    02 - Heat Only
    03 - Heat with reheat
    04 - Full Auto
    05 - Full Auto with reheat (default)

17 - Factory Reset All
    11- Yes
    All others - No

18 - Display Configuration and Network Settings

    Order of Display:

    1- PSOC Version Number
    2- Ember Version Number
    3- Heat Type
    4- Heat Source
    5- Temperature Calibration
    6- Relays Detected
    7- Network State
    8- Network Channel
    9-10- PanID

19 - Reset Counter
    0-
    1- Reset to 0

20 - Standby Brightness Level
    0-99- Brightness percentage leve